How to Change Shopify Store Name, and Domain Name [2025]
Last updated on
February 10, 2025

The influence a name and URL can have on your business is massive. A good business name can help people imagine the quality of your products and remember them, while a bad name (unmemorable) can quickly get out of people's minds.
Getting to the point, various Shopify users have been asking questions like how to change the Shopify store name and domain name. While diving deep into this subject, I found out that multiple Shopify store merchants felt unsatisfied with their store and domain names. Multiple store merchants felt their business name was similar to their competitors, and they wanted something original.
So to help all the people looking for a solution to this issue, I started my research and curated this comprehensive blog. This step-by-step guide will not just help you change your Shopify store name and domain name, but also walk you through the steps to achieve the same. So let's dive straight into this guide!👇
Why Should You Change Shopify Store/Website Name?

Business names are one of the core factors that influence your business the most. A good and unique business name makes your business stand out from your competitors. It also helps you bridge the gap between you and your customers.
Changing your Shopify business/store name helps you better represent your brand and ensure positive results. Also, if you think your Shopify store name is unclear, or is similar to your competitors, then changing your store name becomes a must.
Besides, using a similar Shopify store name has its own repercussions like a bad impact on SEO score on search engines. Moreover, if you think you're out of ideas for your Shopify store name, you can utilize name generator tools like Shopify name generator.
How to Change Shopify Store Name
Changing your Shopify store name can be easily done through your Shopify admin panel. Follow these steps to quickly achieve the same:
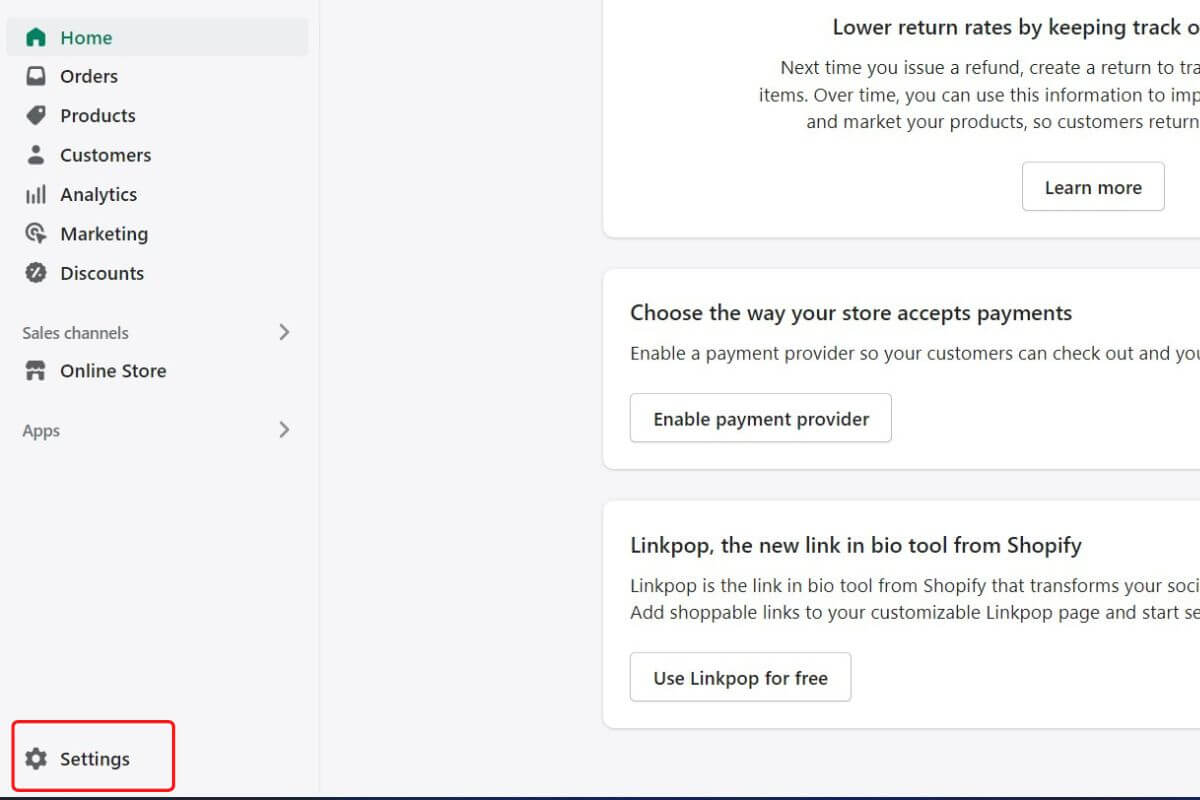
- Step 1: Log in to your Shopify store admin and click Settings.
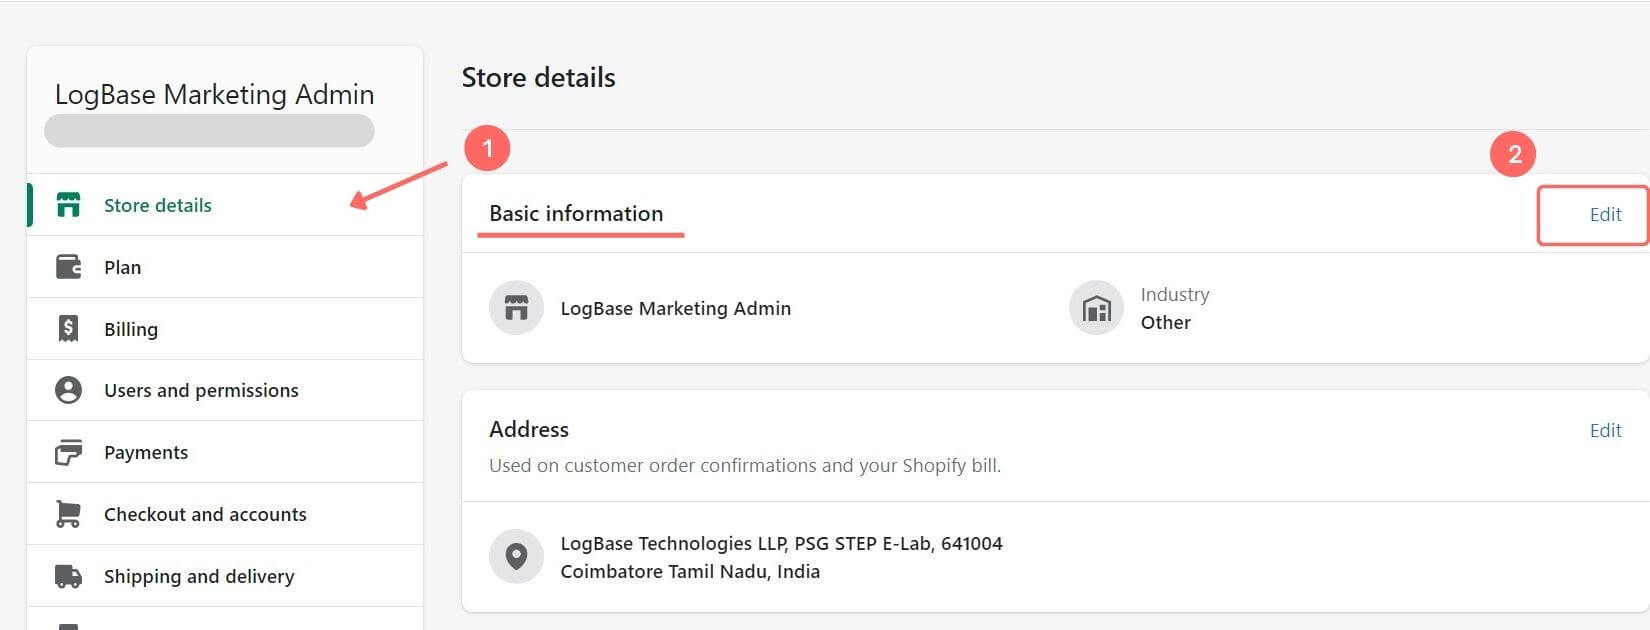
- Step 2: From the left pane, select Store details, and in the Basic information section, click Edit.
- Step 3: Now replace your Store name with the new one and click Save.
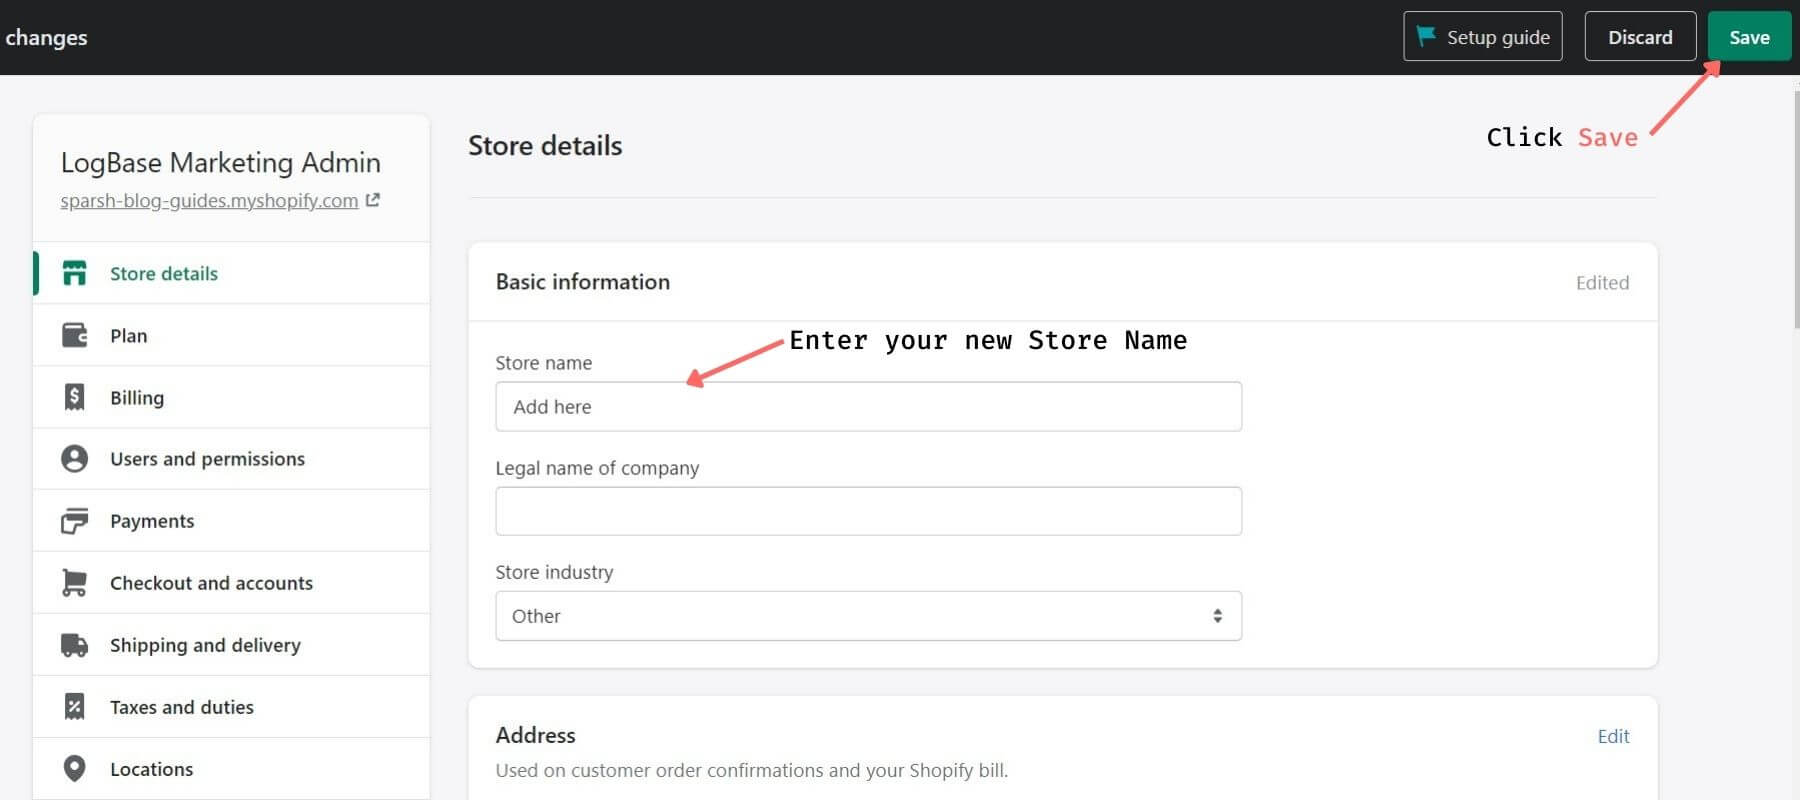
That’s it! You've changed your Shopify store name.
Did You Know?
There are three types of domains used in Shopify, i.e. Primary, Routing and Redirect. Also, in addition to this, there are various targets. Each of these targets must have one primary domain.
However, they can also have zero or more routing domains and redirect domains. These targets can be both an online store and a custom storefront.
How to Change Shopify Domain Name (URL)
Once you create your online store on Shopify, the name you select gets linked with the ".myshopify.com" URL forever. There is no need to change it as this is not customer-facing. Most Shopify merchants have their own custom domain, or they buy a new domain which they later map with their online store.
The custom domain is the only URL that your customers will ever see, they won't see your “.myshopify.com” in your store URL.
If you've already bought a custom domain name, and you want it to connect to your Shopify store, follow these steps:
- Step 1: Log in to your Store Admin and select Settings.
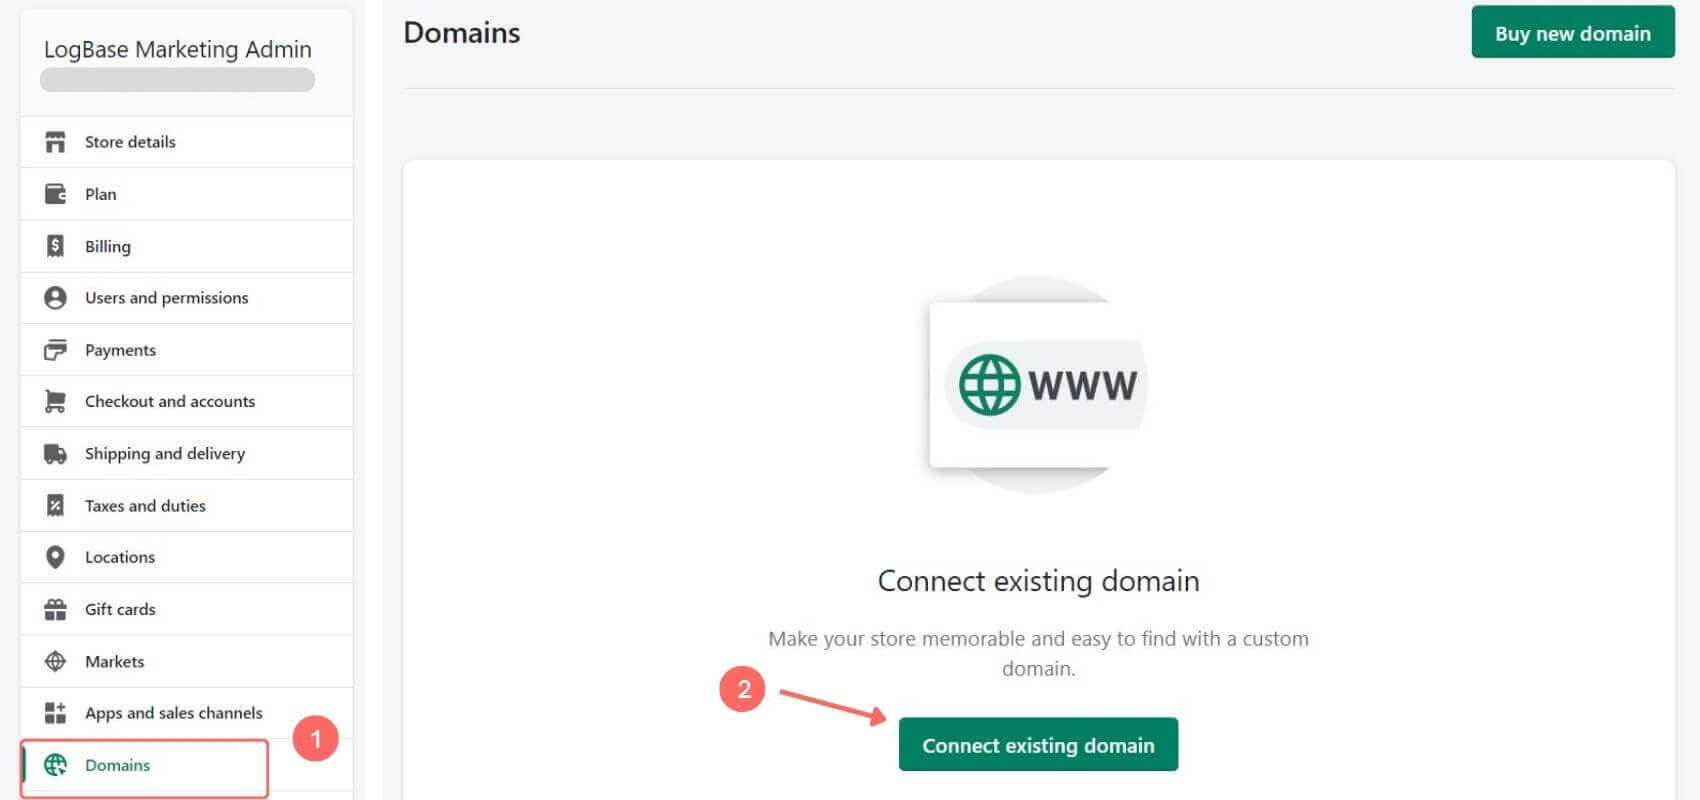
- Step 2: Scroll down, click the Domains option from the left pane, and hit the Connect existing domain option.
Note: If you don't already have a domain, just choose "Buy new domain" to acquire one. Shopify's domain normally costs you around $14 per year.
However, you may acquire a domain through other domain registrars too. It totally depends upon you, but that way you may need to do some extra hassle trying to connect them to your store.
- Step 3: Enter your Domain in the displayed format and click Next.
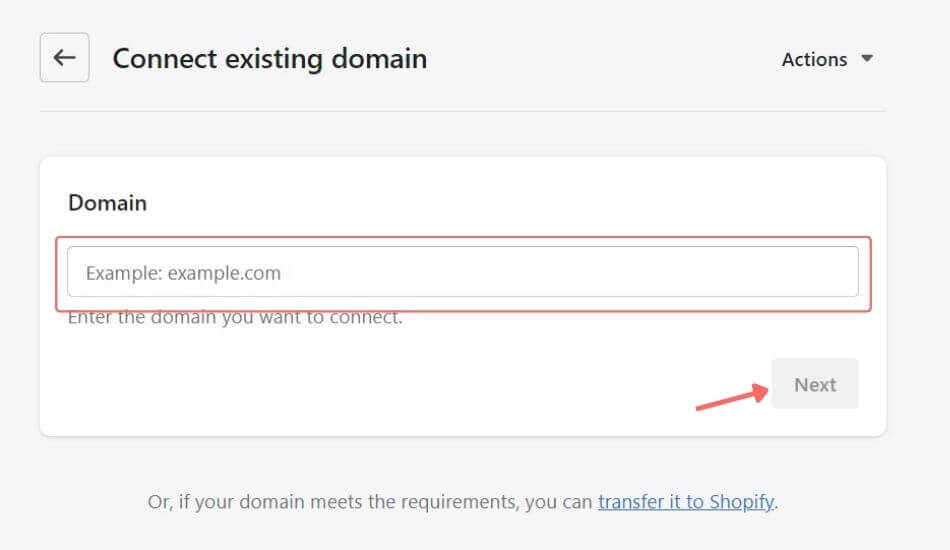
On the bottom, you will also see a ‘transfer it to Shopify’ hyperlink. You can transfer your domain to Shopify if you want to manage it from your Shopify admin.
To connect your domain, you first need to log in to your registrar account and modify your settings. Follow the step-by-step instructions.
- Step 4: Click on Follow settings instructions and follow the steps to modify your settings.
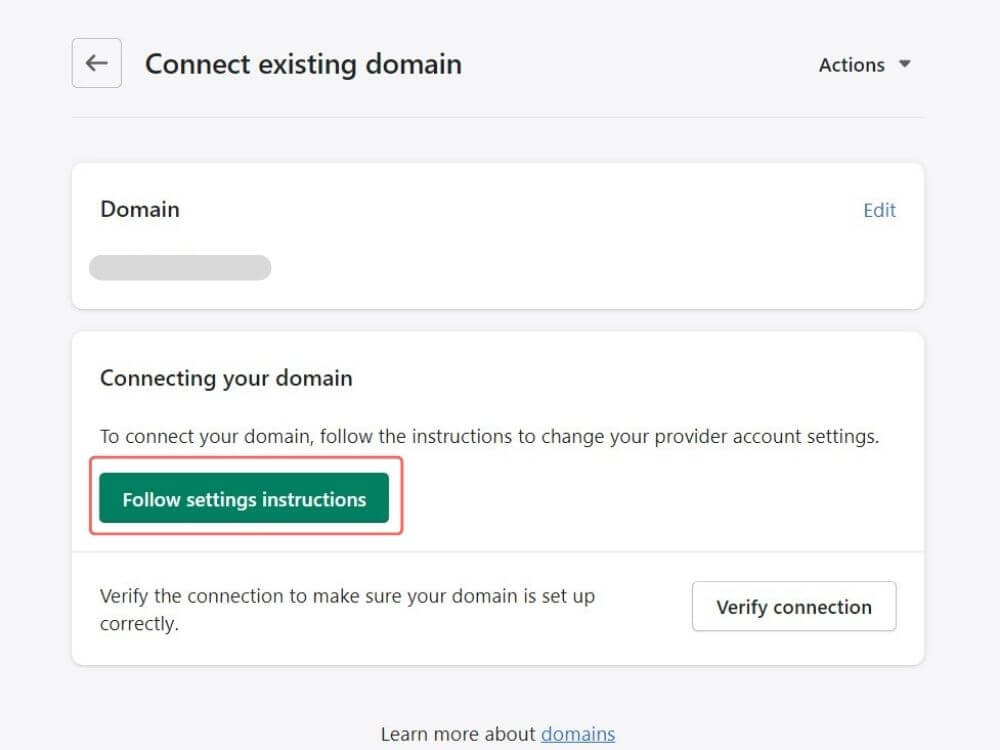
- Step 5: After completion, click on Verify connection button to ensure the proper setup of your domain. Tap the Add Domain button.
It takes up to 48 hours for your new domain to point to your Shopify store. Check back after some time and if you see a ‘Connected’ status on your dashboard, it means that your custom domain has been successfully added to your store.
Change your Primary Domain
After connecting a new domain to your Shopify store, you need to set up this as your Primary Domain to make sure it works as the main domain.
- Step 1: Select the Change primary domain link and pick the new domain.
- Click on the Save button and that's it!
Congrats!! You've successfully added your new domain as your Primary Domain.
Note - The original “.myshopify.com” will continue to work, but it will redirect all the traffic to the new domain.
Frequently Asked Questions (FAQs)
Is it a wise decision to buy my Domain through Shopify?
Well, it depends. Buying a domain from Shopify has its own pros and cons. The pro is that Shopify will instantly set up your domain for you, eliminating the need for you to set up DNS records.
The con is that Shopify's domain service does not include email accounts, which of course has some ways around it. However, if you truly want to know how it would play out for you, then you may need to consider what factors matter to you the most.
It usually boils down to two major factors you'll have to compare, i.e. saving a few dollars for some extra time and effort or some extra cash for less time and effort.
Can I Connect or Transfer my Existing (sub) Domains?
Yes, you can. Having various existing subdomains in eCommerce is common. To tackle this, many Shopify store owners tend to either transfer or connect these subdomains with their main domain. If you also happen to fall in this scenario, then below are some easy steps to take.
- Step 1: Open Store admin and choose Settings.
- Step 2: Scroll down and, from the left pane, select the Domains > Connect existing domain option.
- Step 3: Type the domain you wish to connect to and press the Next button to proceed.
- Step 4: Log in to your domain registrar and update your domain A record to point to your Shopify’s IP address 23.227.38.65
- Step 5: Now swap your www CNAME with shops.myshopify.com.
Note: Make sure to use [subdomain]-shops.myshopify.com if you're utilizing a subdomain, where [subdomain] is the actual subdomain name. For instance, to link subdomain test.abc.com, you may use test-shops.myshopify.com.
- Step 6: After this, get back to your domain page and click on Verify connection button.
Wait for the changes to reflect. As the DNS changes may take some time to propagate.
After the domain is connected/transferred to your account, you should get a message displayed stating that your domain was successfully connected.
How to Change your Shopify Store Name and Domain Name: Final words
Hope this step-by-step guide helped you and answered your query on how to change the Shopify store name and domain name. I tried to make this as simple as possible so no one is left out.
Anyway, if you have any questions on this, please let us know (marketing@logbase.io). Don't forget to subscribe to our newsletter 📧 to receive more insightful Shopify guides like this. Happy Growing!🙂
People also read:
.svg)

%20(2).png)

.png)
.svg)
.svg)
.svg)
.png)

.svg)